Web editor
The OmniGUI web editor draws a menu in your browser, slot by slot, and writes it as an Open GUI entry in the Typewriter staging. You see the menu the way the player will: the container background, the compiled title, the nine-patch panels, the item icons. It is off by default: it opens a port on the server, so you turn it on yourself.
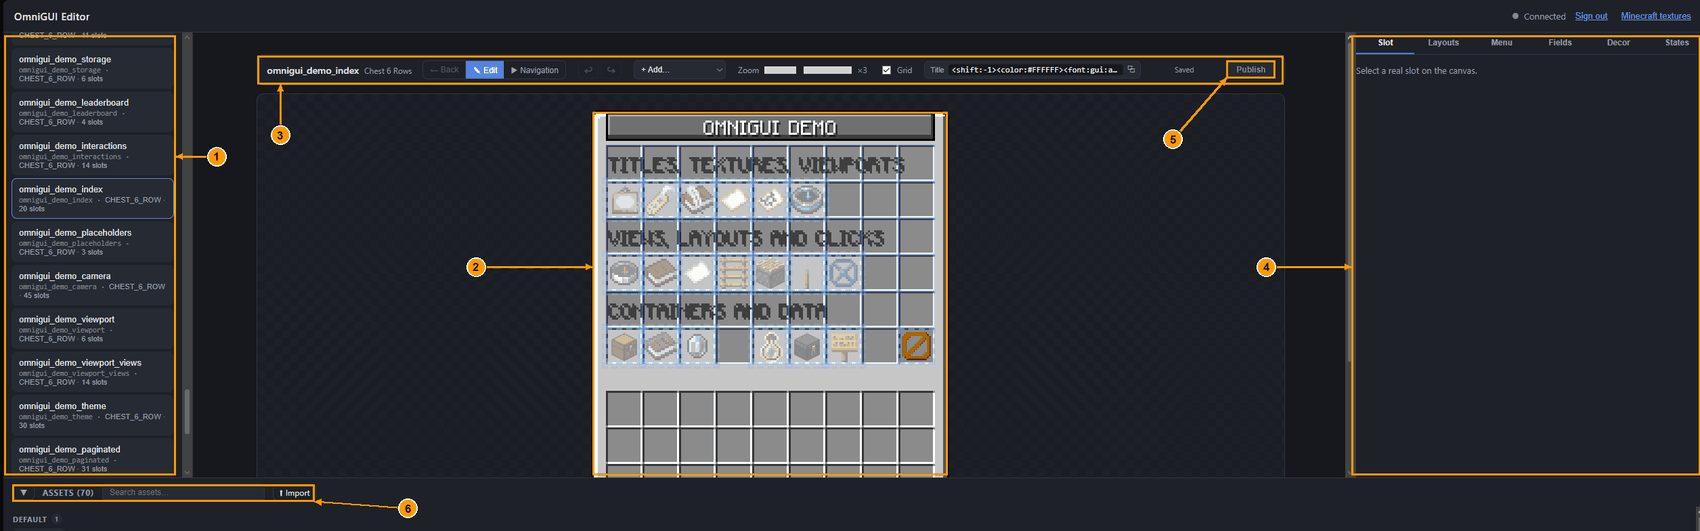
- Menu list, grouped by Typewriter page.
- Canvas: the menu as the player will see it.
- Toolbar: back, mode (Edit or Navigation), undo and redo, add a layer, zoom, grid, view, title, saved state and Publish.
- Properties panel: tabs Slot, Layouts, Menu, Fields, Decor and States.
- Publish button.
- Asset browser, at the bottom.
What this guide covers
Read the pages in order the first time, then use them as a reference.
| Page | You learn |
|---|---|
| This page | Turn the editor on for a local, network, hosted or proxied server, open it, gui_editor.yml, import your client jar, the interface. |
| Build a menu | Create a menu, place buttons and items, click actions, save, publish and test. |
| Titles, nine-patch and viewports | Decor layers, the compiled title, nine-patch panels, scrolling viewports. |
| Views, layouts, states and data | Views and history, layouts, states, fact tiers, storage, leaderboard. |
| Textures, packs and placeholders | Textures, resource pack plugins, your own images, PlaceholderAPI, CraftEngine settings. |
| Demo pack and troubleshooting | The 48 demo menus and the answers to the usual problems. |
Open the editor
A menu button can run console commands, so whoever edits menus can run any command. Give typewriter.omnigui.editor to trusted administrators only, and never share the access token.
The OmniGUI extension must be installed (see the GUI page). Nothing else is required: CraftEngine, Nexo, ItemsAdder and PlaceholderAPI only add features.
- Start the server once with OmniGUI installed: the file
plugins/Typewriter/gui_editor.ymlis written with its defaults. - Edit that file for your setup: see Choose your setup just below. On your own computer, only
enabled: truechanges. - Run
/tw reload(or restart the server). The console must show[OmniGUI] Editor host listening on <address>:<port>. If it shows another[OmniGUI]line instead, it says why the editor stayed off. - In game, with the permission
typewriter.omnigui.editor, run/tw omnigui editor. The command works in game only, not from the console. - Click the link in the chat. It is single use and valid for 60 seconds: the code sits in the
#code=part of the address, which your browser never sends to a proxy or a server log. Run the command again for a new link. - The first time, import your Minecraft client jar so the editor can draw the vanilla textures: see Import your client jar.
If the editor does not start, the server log says why in a line that begins with [OmniGUI]: a port already in use, a public-url with a path, or a token shorter than 32 characters.
Choose your setup
The link you receive is built from public-url. When public-url is empty, the link is http://<bind>:<port>, and with a bind of 0.0.0.0 it becomes http://127.0.0.1:<port>. 127.0.0.1 always means "this computer": opened on your PC, such a link looks for the editor on your PC, not on the server. So as soon as the browser is not on the server machine, public-url is required, and it must be the exact address you type in the browser to reach the editor.
| Where the server runs | bind | port | public-url |
|---|---|---|---|
| On the computer you play and browse on | 127.0.0.1 (default) | 8082 (default) | empty |
| On another computer of your home network | 0.0.0.0 | 8082 | http://<LAN IP of the server>:8082 |
| At a host with a panel (Pterodactyl, Pebble, Apex…) | 0.0.0.0 | a port the host gives you | http://<server IP>:<that port> |
| On a VPS or dedicated machine with a domain | 127.0.0.1 | 8082 | https://editor.your-domain.com (reverse proxy) |
On your own computer
editor:
  enabled: true
  bind: 127.0.0.1
  port: 8082
  auth-token: ''   # filled in by the server, leave it
  public-url: ''
  allowed-hosts: []
Run /tw omnigui editor and click the link: it opens http://127.0.0.1:8082. Nothing else to do.
On another computer of your network
For instance a home server at 192.168.1.20, and you edit from your desktop.
editor:
  enabled: true
  bind: 0.0.0.0
  port: 8082
  public-url: http://192.168.1.20:8082
- Find the LAN IP of the server with
ipconfig(Windows) orip a(Linux). - Allow the port in the server's firewall (Windows Defender Firewall, or
sudo ufw allow 8082/tcp). - The console warns that the cookie crosses the network in clear: acceptable inside your own home network, not on the internet.
At a host with a panel
Most hosts only let traffic in on the ports they assign to your server. Port 8082 is usually not open, and 127.0.0.1 is only reachable from inside the host's machine.
- In the panel, open the Network (or Ports, Allocations) tab and add a port to your server. If the panel has no such button, ask the host's support for one extra TCP port. Never reuse the Minecraft port.
- Note the IP address (or host name) and the port the panel shows for it, for instance
51.75.10.20and26763. - Write them in
gui_editor.yml:
editor:
  enabled: true
  bind: 0.0.0.0
  port: 26763
  public-url: http://51.75.10.20:26763
/tw reload, then/tw omnigui editor: the link now openshttp://51.75.10.20:26763.
bindstays0.0.0.0: inside the host's container, the public IP is often not an address the server can listen on, and0.0.0.0listens on all of them. Abindof127.0.0.1on a hosted server is the usual reason the page never loads.- Put the IP or name exactly as you type it in the browser. If you open the editor through
play.example.com:26763whilepublic-urlsays51.75.10.20, saves are refused: add the other name toallowed-hosts(allowed-hosts: [play.example.com]) or, better, use one address everywhere. - This is plain
http: the console warns that the session cookie crosses the internet in clear. Keep the editor on only while you work on menus (enabled: false, then/tw reload), and prefer the reverse proxy below if your host offers a domain with HTTPS.
On a VPS with a domain (recommended for the internet)
Keep the editor on 127.0.0.1 and put a reverse proxy with TLS in front of it, on a sub-domain of its own (for example editor.example.com, its DNS pointing to the VPS):
editor:
  enabled: true
  bind: 127.0.0.1
  port: 8082
  public-url: https://editor.example.com
A minimal nginx site, with the certificate from Let's Encrypt (sudo certbot --nginx -d editor.example.com):
server {
    listen 443 ssl;
    server_name editor.example.com;
    # ssl_certificate lines added by certbot

    location / {
        proxy_pass http://127.0.0.1:8082;
        proxy_set_header Host $host;
        # The editor uses a WebSocket on /ws
        proxy_http_version 1.1;
        proxy_set_header Upgrade $http_upgrade;
        proxy_set_header Connection "upgrade";
        proxy_read_timeout 1h;
    }
}
Any other proxy (Caddy, Apache, Traefik, a panel's built-in proxy) works the same way: HTTPS on the sub-domain, everything forwarded to 127.0.0.1:8082, WebSocket upgrades allowed.
The session is bound to the player who ran the command. It lasts up to 12 hours, and it ends at the next request if that player loses the permission. Sign out (top right) closes it, in every open tab.
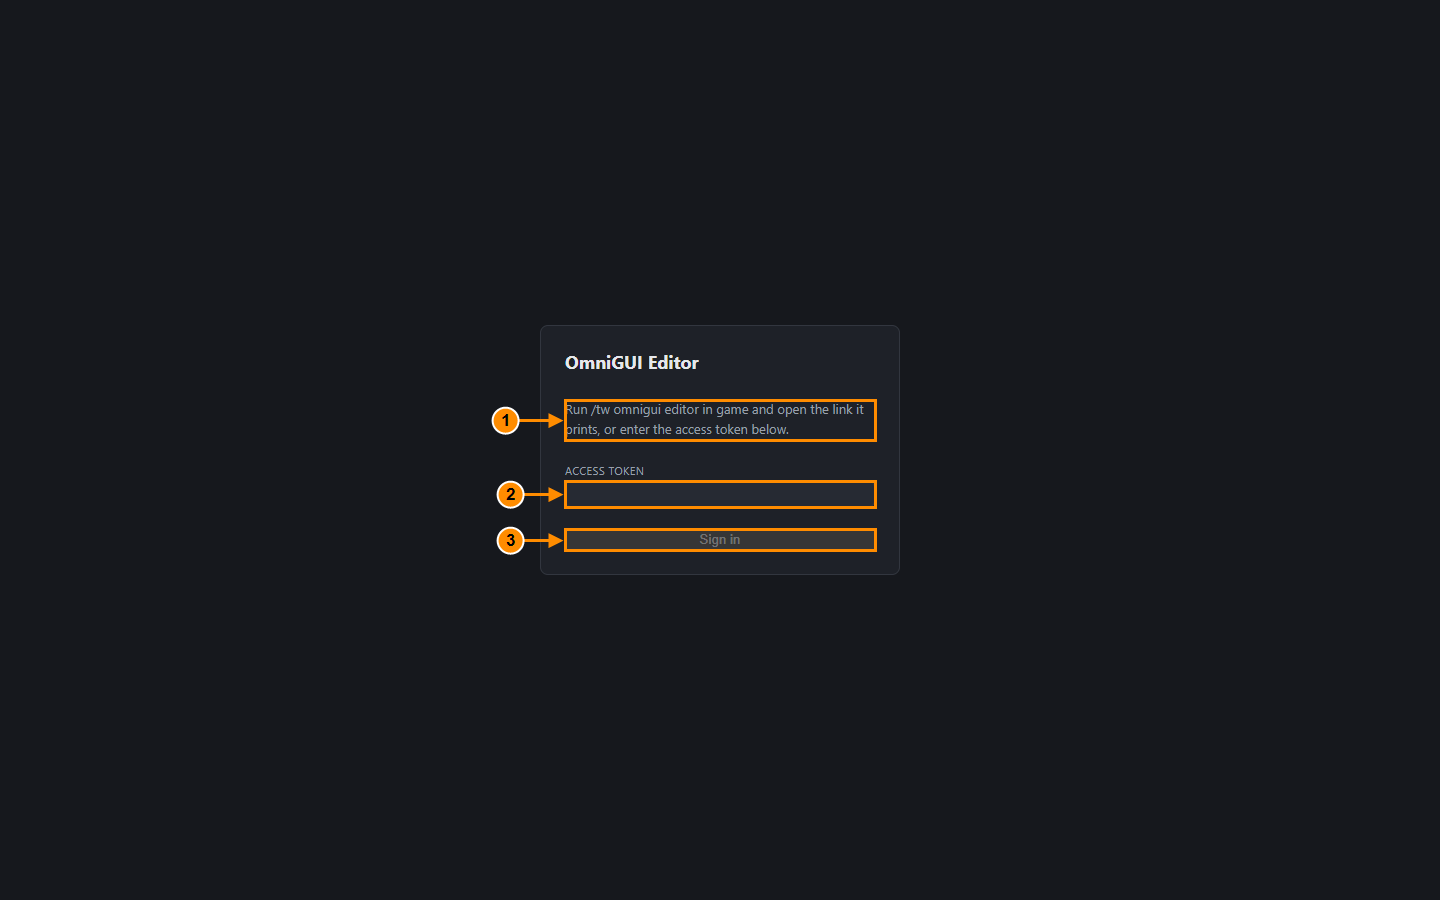
- The instruction: run
/tw omnigui editorin game and open the link. - Access token field. Use it only as a fallback: a token session names no player, so it cannot test a menu in game.
- Sign in button.
gui_editor.yml
The file lives in plugins/Typewriter/. It is a plain file on purpose, not an entry: an entry could be edited from the editor itself, which would let a session move the bind address or read the token.
| Key | Default | Role |
|---|---|---|
editor.enabled | false | Turns the editor host on. |
editor.bind | 127.0.0.1 | IP address the editor listens on. It must be an IP address, not a name; anything else falls back to the default, with a warning. |
editor.port | 8082 | TCP port, 1 to 65535. Anything else falls back to 8082, with a warning. |
editor.auth-token | empty | Fallback token. Left empty, a random token is generated and written here, never logged. A token shorter than 32 characters, or the word disabled, keeps the editor off. |
editor.public-url | empty | Address used in the links. Left empty, links use the bind address and port. |
editor.allowed-hosts | empty list | Extra host names accepted in the Host header. |
The file holds the token: on systems with file owners it is written readable by its owner only.
Ready-made examples for each case are in Choose your setup. The rules behind them:
public-urlis the editor's own origin:scheme://host[:port], without a path, credentials, query or fragment. A path such ashttps://panel.example.com/editorkeeps the editor off, with a warning in the console. Give the editor a sub-domain of its own. Write the port when it is not 80 (http) or 443 (https).- The page must be opened at the
public-urladdress: the editor accepts saves and the WebSocket only from that origin. - A proxy must also forward WebSocket connections (the editor uses the
/wsroute). allowed-hostsis for the other names your proxy answers to. Use host names only, no scheme, port or path. A name missing from the list is answered with a421error.- After any change to the file, run
/tw reload. - Behind an
httpsaddress the session cookie is named__Host-omnigui_session(Secure). A plainhttpaddress to another machine, or a bind other than loopback withouthttps, logs a warning: the token and the cookie would cross the network in clear. - The embedded server has no cap on TCP connections: limit them in the proxy (for example
limit_connin nginx). Behind a proxy every client shares the proxy's address, which matters for the per-address limits below. - Failed token sign-ins are limited to 10 per minute per address. The one-time link keeps working. Requests in flight are limited to 8 per address and 64 in all.
On your own machine you need none of this: leave bind and public-url alone, run /tw omnigui editor and click the link.
Import your client jar
OmniGUI does not ship Mojang's textures: the vanilla container backgrounds, the title font and the flat item icons come from your own Minecraft client jar, read by your browser. Without it the menus show no background and no icons.
-
In the Minecraft launcher, start the version your server runs (for instance 26.3) once, so the launcher downloads its jar. You can quit the game at the title screen.
-
Find the jar. With the official launcher it is in the
versionsfolder, in a folder named after the version, under the same name with.jar:System Path Windows %APPDATA%\.minecraft\versions\26.3\26.3.jar(paste%APPDATA%\.minecraft\versionsin the File Explorer address bar)macOS ~/Library/Application Support/minecraft/versions/26.3/26.3.jar(Finder: Go > Go to Folder…)Linux ~/.minecraft/versions/26.3/26.3.jarOther launchers keep it elsewhere: CurseForge in
curseforge\minecraft\Install\versions\26.3\26.3.jar; Prism Launcher and MultiMC inlibraries/com/mojang/minecraft/26.3/minecraft-26.3-client.jarinside their data folder. Take the plain vanilla jar, not a Fabric, Forge or OptiFine profile folder. -
In the editor, click Minecraft textures (bottom of the menu list), then Import client jar…, and pick the file. The dialog shows "Imported: Minecraft 26.3" when it is done.
- The jar is read in your browser and stays there: nothing is uploaded to the server.
- You import it once per browser: it is kept in the browser's storage for this editor address, and reloads, new links and server restarts keep it. You import it again only in another browser, in another browser profile, after clearing the site data, or if the editor's address (
public-url) changes. - Private browsing cannot keep it: the import fails with "This browser could not store the textures".
- When the server moves to a new Minecraft version, import the new jar (Import another jar…); Forget removes the stored one.
More on where textures come from: Textures.
Tour of the interface
The menu list
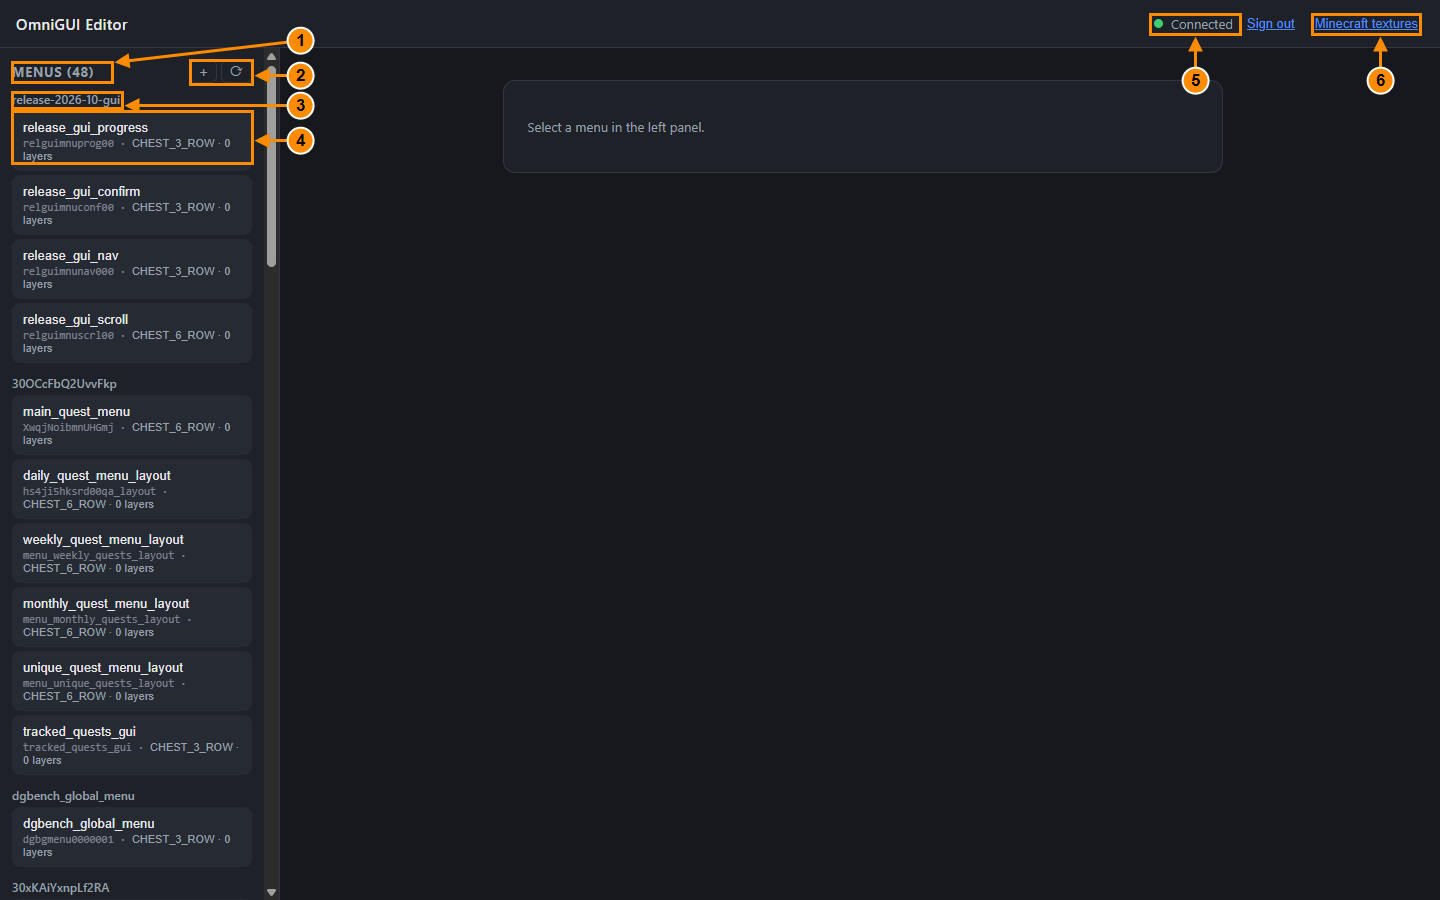
- Number of menus.
- + (create) and refresh buttons.
- Group title: the Typewriter page.
- A menu row: name, id and container type.
- Connection state.
- Minecraft textures link (see Textures).
The list holds every Open GUI entry of every Typewriter page, grouped by page. Click a row to open it on the canvas. Use the refresh button after you add an entry in the Typewriter web panel.
The canvas and the toolbar
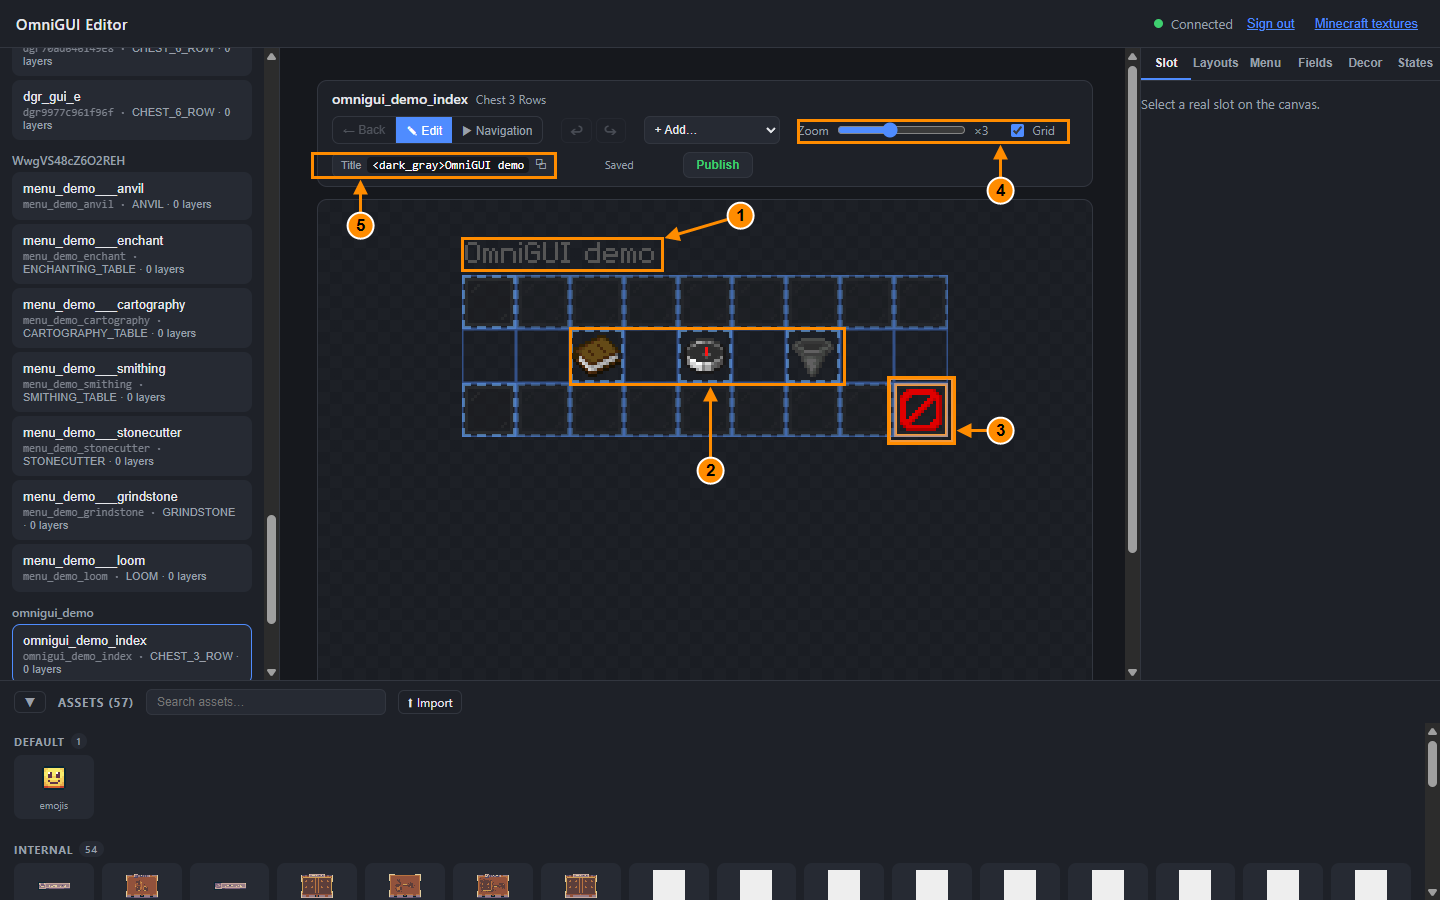
The toolbar, left to right:
- Back, Edit and Navigation. In Edit you drag, resize and change properties. In Navigation you try the menu: hover, tabs, scroll arrows and clicks behave like in game, and Back returns to the previous screen (the number shows how many screens are stacked).
- In Edit mode: undo and redo (
Ctrl+Z,Ctrl+Shift+Z), the + Add... list (Image, Text, Flex container, Viewport, Tilemap, Ninepatch) and the delete button for the selected layer (Del). - Zoom (1 to 6 times), Grid, and the View selector, which only appears on a menu that has views.
- Title: the raw MiniMessage title the editor compiled from the layers. Click it to copy it.
- The saved state (Unsaved or Saved), then Publish.
Shortcuts: Ctrl+S saves the open menu. With a layer selected, the arrow keys move it by 1 pixel and Shift with an arrow by 18 pixels.
The right panel
In Edit mode the right panel has six tabs.
| Tab | What it is for | Guide |
|---|---|---|
| Slot | The selected slot: item, name, lore, button type, permissions, click actions. | Build a menu |
| Layouts | The layouts of the menu and their slots. | Views, layouts, states and data |
| Menu | Container type, size, refresh and other settings of the whole menu. | Build a menu |
| Fields | Every field of the entry. | Build a menu |
| Decor | The decor layers of the title: tree and properties. | Titles, nine-patch and viewports |
| States | Conditions that change how the menu looks. | Views, layouts, states and data |
In Navigation mode the right panel is the test panel, with the Test in game button (see Build a menu).
Save, publish and staging
There is no autosave. Ctrl+S writes the open menu to the Typewriter staging, and the toolbar then shows Saved; Unsaved means the change is still only in your browser tab. Publish saves the open menu first, then publishes. Nothing reaches the players until you publish.
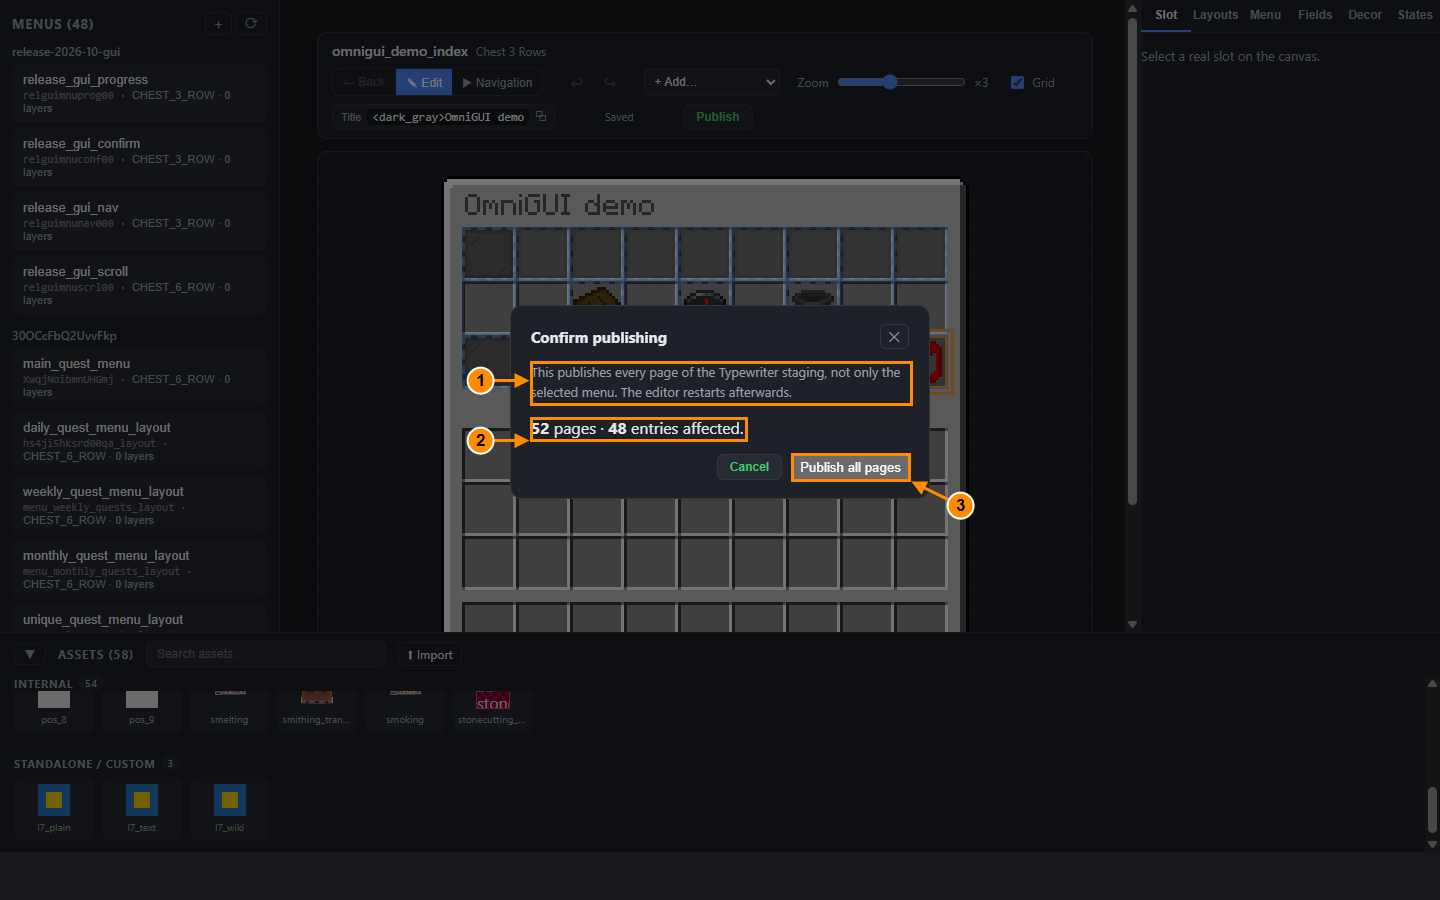
- Publish applies every page of the staging, not only the selected menu: other changes made in the Typewriter panel go live with it.
- The number of pages and entries affected.
- Publish all pages.
Publishing reloads Typewriter. Editor sessions are kept in memory, so they end: when the page says it is signed out, run /tw omnigui editor again for a new link. The button is disabled while the open menu has blocking validation errors; the tooltip gives their number.
The asset browser
The bottom panel lists the textures you can use in decor layers, grouped by origin, with a search field and an Import button for your own PNG images. See Textures, packs and placeholders.
Sign out and closed sessions
If you sign out in another tab, or the server ends the session (a publish, a reload, a restart, the permission removed), the editor shows "Signed out" and asks for a new link: run /tw omnigui editor again.
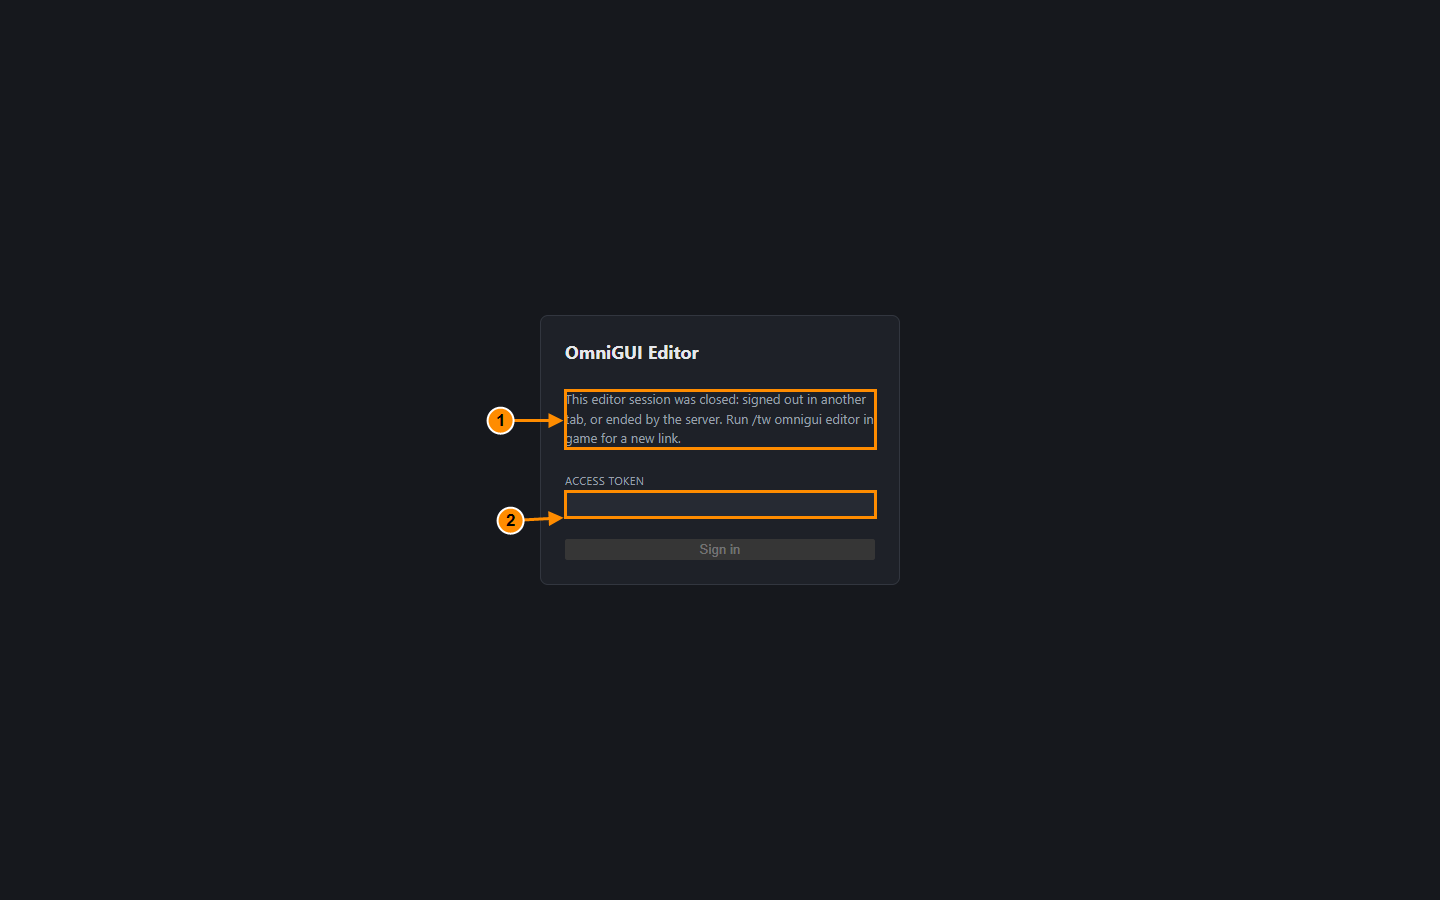
- The reason: signed out in another tab, or ended by the server.
- The token field is empty. Use a new link.